Endlich ist, zumindest wenn Linux als Plattform genutzt werden soll, 18c nun auch On-Premise verfügbar. Seit Februar 2018 war das 18c Datenbank-Release schon für die Oracle Cloud und die Oracle Engineered Systeme zu haben. Wie auch schon bei der Oracle Grid Infrastructure 12.2, wird die Software erstmalig Image-basiert installiert. Um die Datenbanksoftware zu installieren, muss ein Oracle Home Verzeichnis erstellt werden, das Image dorthin entpackt und anschießend der Oracle Installer aufgerufen werden. Diese Installationsmethode rationalisiert den Installationsprozess und unterstützt die Automatisierung von umfangreichen benutzerdefinierten Installationen. Des Weiteren kann diese Methode auch für die Bereitstellung angepasster Images verwenden, nachdem die Basis-Release-Software mit den erforderlichen Release-Updates (Updates) oder Release-Update-Revisionen (Revisionen) versehen wurde.

In diesem Artikel möchte ich exemplarisch einmal die Image-basierte Installation der On-Premise 18.3 Datenbanksoftware unter Oracle Linux vorstellen.
Vorbereitung Oracle Linux
Ich habe das aktuelle Oracle Linux 7.5 installiert (Minimal Install) und Storage und Netzwerk im Vorfeld entsprechend meinen Bedürfnissen eingerichtet. Ich habe noch zusätzlich wget installiert, da mein Linux-Server Zugriff auf das Internet hat und ich ein Paket komfortabel direkt vom YUM-Repository-Server herunterladen möchte.
Als User root
yum install wget -y
Da ich für meine Installation Oracle Linux verwende, nutze ich das von Oracle bereitgestellte 18c PreInstall-Paket oracle-database-preinstall-18c. Das Paket erstellt die notwendigen OS-User und -Gruppen, installiert fehlende Pakete und nimmt erforderliche Konfigurationen am Linux vor. Das Paket kann wie folgt vom dem Oracle Linux YUM Server heruntergeladen werden, wenn keine ULN-Subscription besteht (Unbreakable Linux Network).
Als User root
wget https://yum.oracle.com/repo/OracleLinux/OL7/latest/x86_64/getPackage/oracle-database-preinstall-18c-1.0-1.el7.x86_64.rpm
yum install local oracle-database-preinstall-18c-1.0-1.el7.x86_64.rpm -y
Download Oracle Database 18c
Das erforderliche Zip-File für Oracle 18c (LINUX.X64_180000_db_home.zip) kann vom Oracle Technology Network oder aus der Oracle Software Delivery Cloud heruntergeladen werden. Für beides ist ein OTN Account erforderlich.
Softwareinstallation
Erstellung Oracle Home
Als User root
mkdir -p /u01/app
chmod o+rwx /u01/app
Als User oracle
mkdir -p /u01/app/oracle/product/18.3.0.0.0
Installations-Zipfile in das Zielverzeichnis kopieren
Als User oracle
cp LINUX.X64_180000_db_home.zip /u01/app/oracle/product/18.3.0.0.0
Entpacken der Software
Als User oracle
cd /u01/app/oracle/product/18.3.0.0.0/dbhome_1
unzip -q LINUX.X64_180000_db_home.zip
rm LINUX.X64_180000_db_home.zip
Aurufen des Oracle Installer
Abgesehen davon, dass keine Datenbanksoftware installiert wird, unterscheidet sich der 18c-Installer nicht großartig von dem Installer vorheriger Releases. Mit dem Installations-Wizard werden wie gewohnt die Voraussetzungen geprüft, die Edition ausgewählt, OS-Gruppen zugeordnet und das Oracle Inventory und das Oracle Base angelegt.
Der Installer kann entweder im Silent-Mode auf der Kommandozeile mit den entsprechend zuvor im Responsefile konfigurierten Parametern aufgerufen werden oder ganz regulär mit einer interaktiven grafischer Unterstützung. Die Silent-Installation bietet sich bei automatisierten Installationen an und wenn man sich sicher sein kann, dass alle Betriebssystemvoraussetzungen erfüllt sind. Über die erforderlichen Responsefile-Parameter muss man sich natürlich dann zuvor Gedanken machen. Außerdem bietet sich dieser Modus an, wenn man keine GUI aufrufen kann weil z.B. keine X-Windows System oder VNC-Server zur Verfügung steht
Ich werde beide Methoden einmal exemplarisch in meinem Beispiel durchführen. Dabei werde ich nur die Software installieren und noch keine Datenbank anlegen (Software Only).
Oracle Installer Silent Mode
Durchführung von PreChecks (Optional)
Als User oracle
export ORACLE_HOSTNAME=`hostname`
cd /u01/app/oracle/product/18.3.0.0.0/dbhome_2
./runInstaller -silent -executePrereqs
Output:
Launching Oracle Database Setup Wizard...

[WARNING] [INS-13014] Target environment does not meet some optional requirements.
CAUSE: Some of the optional prerequisites are not met. See logs for details. /u01/app/oraInventory/logs/InstallActions2018-07-24_10-24-42PM/installActions2018-07-24_10-24-42PM.log
ACTION: Identify the list of failed prerequisite checks from the log: /u01/app/oraInventory/logs/InstallActions2018-07-24_10-24-42PM/installActions2018-07-24_10-24-42PM.log. Then either from the log file or from installation manual find the appropriate configuration to meet the prerequisites and fix it manually.
Das generierte Logfile gibt hier weitere Auskunft über die nicht erfüllten Voraussetzungen. In meinem Beispiel ist es mangelnder Arbeitsspeicher.
/u01/app/oraInventory/logs/InstallActions2018-07-24_10-24-42PM/installActions2018-07-24_10-24-42PM.log
INFO: [Jul 24, 2018 10:27:02 PM] *************** End of CVU Error logs ***************
INFO: [Jul 24, 2018 10:27:02 PM] All forked task are completed at state prepInstall
INFO: [Jul 24, 2018 10:27:02 PM] ------------------List of failed Tasks------------------
INFO: [Jul 24, 2018 10:27:02 PM] *********************************************
INFO: [Jul 24, 2018 10:27:02 PM] Physical Memory: This is a prerequisite condition to test whether the system has at least 8GB (8388608.0KB) of total physical memory.
INFO: [Jul 24, 2018 10:27:02 PM] Severity:IGNORABLE
INFO: [Jul 24, 2018 10:27:02 PM] OverallStatus:VERIFICATION_FAILED
INFO: [Jul 24, 2018 10:27:02 PM] -----------------End of failed Tasks List----------------
INFO: [Jul 24, 2018 10:27:02 PM] Adding ExitStatus PREREQUISITES_NOT_MET to the exit status set
Silent-Mode Installation
Vor dem Start des Installers müssen die gewünschten und notwendigen Parameter in einem Responsefile eingetragen werden. Man kann die im Oracle Home befinde Vorlage db_install.rsp dafür nutzen oder erstellt daraus eine Kopie, die man dann bearbeitet.
Als User oracle
cd /u01/app/oracle/product/18.3.0.0.0/dbhome_1/install/response
cp db_install.rsp /u01/app/oracle/product/18.3.0.0.0/dbhome_1/my_db_install.rsp
/u01/app/oracle/product/18.3.0.0.0/dbhome_2/install/response/my_db_install.rsp
#-------------------------------------------------------------------------------
# Specify the installation option.
# It can be one of the following:
# - INSTALL_DB_SWONLY
# - INSTALL_DB_AND_CONFIG
#-------------------------------------------------------------------------------
oracle.install.option=INSTALL_DB_SWONLY

#-------------------------------------------------------------------------------
# Specify the Unix group to be set for the inventory directory.
#-------------------------------------------------------------------------------
UNIX_GROUP_NAME=oinstall

#-------------------------------------------------------------------------------
# Specify the location which holds the inventory files.
# This is an optional parameter if installing on
# Windows based Operating System.
#-------------------------------------------------------------------------------
INVENTORY_LOCATION=/u01/app/oraInventory

#-------------------------------------------------------------------------------
# Specify the complete path of the Oracle Home.
#-------------------------------------------------------------------------------
ORACLE_HOME=/u01/app/oracle/product/18.3.0.0.0/dbhome_1

#-------------------------------------------------------------------------------
# Specify the complete path of the Oracle Base.
#-------------------------------------------------------------------------------
ORACLE_BASE=/u01/app/oracle

#-------------------------------------------------------------------------------
# Specify the installation edition of the component.
#
# The value should contain only one of these choices.
# - EE : Enterprise Edition
# - SE2 : Standard Edition 2
#-------------------------------------------------------------------------------
oracle.install.db.InstallEdition=SE2

#------------------------------------------------------------------------------
# The OSDBA_GROUP is the OS group which is to be granted SYSDBA privileges.
#-------------------------------------------------------------------------------
oracle.install.db.OSDBA_GROUP=dba

#------------------------------------------------------------------------------
# The OSOPER_GROUP is the OS group which is to be granted SYSOPER privileges.
# The value to be specified for OSOPER group is optional.
#------------------------------------------------------------------------------
oracle.install.db.OSOPER_GROUP=
#------------------------------------------------------------------------------
# The OSBACKUPDBA_GROUP is the OS group which is to be granted SYSBACKUP privileges.
#------------------------------------------------------------------------------
oracle.install.db.OSBACKUPDBA_GROUP=backupdba

#------------------------------------------------------------------------------
# The OSDGDBA_GROUP is the OS group which is to be granted SYSDG privileges.
#------------------------------------------------------------------------------
oracle.install.db.OSDGDBA_GROUP=dgdba

#------------------------------------------------------------------------------
# The OSKMDBA_GROUP is the OS group which is to be granted SYSKM privileges.
#------------------------------------------------------------------------------
oracle.install.db.OSKMDBA_GROUP=kmdba

#------------------------------------------------------------------------------
# The OSRACDBA_GROUP is the OS group which is to be granted SYSRAC privileges.
#------------------------------------------------------------------------------
oracle.install.db.OSRACDBA_GROUP=racdba
Wenn das Responsefile vorbereitet wurde, kann der Installer ausgerufen werden.
Als User oracle
cd /u01/app/oracle/product/18.3.0.0.0/dbhome_1
./runInstaller -ignorePrereq -waitforcompletion -silent -showProgress -responseFile ./db_install.rsp
Output:
Launching Oracle Database Setup Wizard...

[WARNING] [INS-13014] Target environment does not meet some optional requirements.
CAUSE: Some of the optional prerequisites are not met. See logs for details. /u01/app/oraInventory/logs/InstallActions2018-07-25_09-27-27AM/installActions2018-07-25_09-27-27AM.log
ACTION: Identify the list of failed prerequisite checks from the log: /u01/app/oraInventory/logs/InstallActions2018-07-25_09-27-27AM/installActions2018-07-25_09-27-27AM.log. Then either from the log file or from installation manual find the appropriate configuration to meet the prerequisites and fix it manually.
The response file for this session can be found at:
/u01/app/oracle/product/18.3.0.0.0/dbhome_1/install/response/db_2018-07-25_09-27-27AM.rsp

You can find the log of this install session at:
/u01/app/oraInventory/logs/InstallActions2018-07-25_09-27-27AM/installActions2018-07-25_09-27-27AM.log

As a root user, execute the following script(s):
1. /u01/app/oracle/product/18.3.0.0.0/dbhome_1/root.sh

Execute /u01/app/oracle/product/18.3.0.0.0/dbhome_1/root.sh on the following nodes:
[orahost18c]

Successfully Setup Software with warning(s).
Die Warnings beziehen sich auf unzureichenden Arbeitsspeicher (Ist 4 GB, Soll 8 GB) und können in meinem Fall ignoriert werden, da es sich lediglich um eine Testinstallatin handelt.
Im Anschluß nur noch das angegebene Root-Script ausführen
Als User root
/u01/app/oracle/product/18.3.0.0.0/dbhome_1/root.sh
Output
Check /u01/app/oracle/product/18.3.0.0.0/dbhome_1/install/root_orahost18c.vbox.de_2018-07-25_09-35-18-343335977.log for the output of root script
/u01/app/oracle/product/18.3.0.0.0/dbhome_1/install/root_orahost18c.vbox.de_2018-07-25_09-35-18-343335977.log
Performing root user operation.

The following environment variables are set as:
ORACLE_OWNER= oracle
ORACLE_HOME= /u01/app/oracle/product/18.3.0.0.0/dbhome_1
Copying dbhome to /usr/local/bin ...
Copying oraenv to /usr/local/bin ...
Copying coraenv to /usr/local/bin ...

Entries will be added to the /etc/oratab file as needed by
Database Configuration Assistant when a database is created
Finished running generic part of root script.
Now product-specific root actions will be performed.
Oracle Trace File Analyzer (TFA) is available at : /u01/app/oracle/product/18.3.0.0.0/dbhome_2/suptools/tfa/release/tfa_home/bin/tfactl
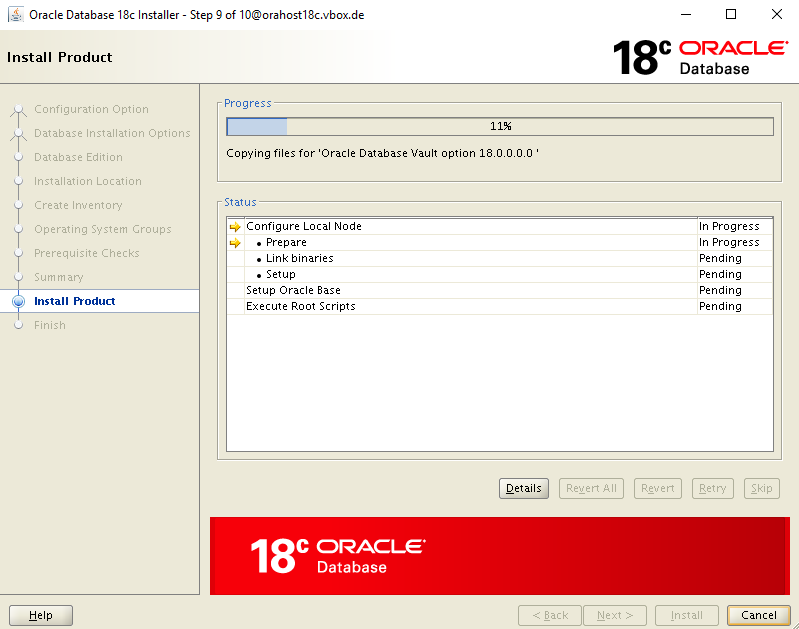
Oracle Installer Interaktiver GUI-Mode
Der interaktive Mode führt den Nutzer mit einer grafischen Benutzeroberflache durch die Installation und fragt dann die notwendigen Informationen ab.
Als User oracle
cd /u01/app/oracle/product/18.3.0.0.0/dbhome_1
./runInstaller


Anmerkung: Der Linux-Server verfügt nur über 4 GB Arbeitsspeicher und erfüllt damit nicht die empfohlenen Voraussetzungen. Da es sich nur um eine Testinstallation handelt, wird dies von mir ignoriert.


Zum Schluss müssen noch wie üblich die beiden root-Scripte ausgeführt werden.
Als User root
/u01/app/oraInventory/orainstRoot.sh
Output
Changing permissions of /u01/app/oraInventory.
Adding read,write permissions for group.
Removing read,write,execute permissions for world.

Changing groupname of /u01/app/oraInventory to oinstall.
The execution of the script is complete.
Als User root
/u01/app/oracle/product/18.3.0.0.0/dbhome_1/root.sh
Output:
Performing root user operation.

The following environment variables are set as:
ORACLE_OWNER= oracle
ORACLE_HOME= /u01/app/oracle/product/18.3.0.0.0/dbhome_1

Enter the full pathname of the local bin directory: [/usr/local/bin]:
Copying dbhome to /usr/local/bin ...
Copying oraenv to /usr/local/bin ...
Copying coraenv to /usr/local/bin ...

Creating /etc/oratab file...
Entries will be added to the /etc/oratab file as needed by
Database Configuration Assistant when a database is created
Finished running generic part of root script.
Now product-specific root actions will be performed.
Do you want to setup Oracle Trace File Analyzer (TFA) now ? yes|[no] :
no
Oracle Trace File Analyzer (TFA - Non Daemon Mode) is available at :
/u01/app/oracle/product/18.3.0.0.0/dbhome_1/suptools/tfa/release/tfa_home/bin/tfactl

Note :
1. tfactl will use TFA Daemon Mode if TFA already running in Daemon Mode and user has access to TFA
2. tfactl will configure TFA Non Daemon Mode only if user has no access to TFA Daemon mode or TFA Daemon mode is not installed

OR

Oracle Trace File Analyzer (TFA - Daemon Mode) can be installed by running this script :
/u01/app/oracle/product/18.3.0.0.0/dbhome_1/suptools/tfa/release/tfa_home/install/roottfa.sh

Weitere Anschlußtätigkeiten
Wenn die Datenbank-Software installiert ist, kanm mit den üblichen Tätigkeiten, wie z.B. Patching des Oracle Home oder das Erstellen von Datenbanken, fortgefahren werden. Diese Tätigkeiten sind nicht Bestandteil dieses Artikels.
Referenzen
Installation Guide 18c for Linux
https://docs.oracle.com/en/database/oracle/oracle-database/18/ladbi/index.html